Developer Guide
![]()
Yang Jiaqi
Zhuang Mengjin
Xu Che
Wu Nan
Wan Shi Jie Brendan
Table of Contents
- Introduction
- Getting Started
- Design
- Implementation
- Documentation
- Testing
- Appendix A. Product scope
- Appendix B. User stories
- Appendix C. Non-functional requirements
- Appendix D. Instructions for manual testing
Introduction
NUSchedule is a Command-Line based application that manages all of your commitments. Built with a clean and intuitive interface, NUSchedule will help you manage your commitments without any hassle. If you are a proficient in typing, NUSchedule will prove itself to be the most efficient way to manage your commitments.
This developer guide provides information on the architecture and design of the application, NUSchedule. This guide provides information that will not only help you get started as a NUSchedule contributor, but that you will find useful to refer to even if you are already a contributor.
Getting Started
This section provides information to help you get NUSchedule up and running on your own computers.
Prerequisites
- JDK 11
- Intellij IDEA
Setting Up
- Fork this repo, and clone the fork onto your computer.
- Open IntelliJ (if you are not in the welcome screen, click File > Close Project to close the existing project dialog first).
- Set up the correct JDK version for Gradle
- Click Configure > Project Defaults > Project Structure
- Click New… and set it to the directory of the JDK.
- Click Import Project (or Open or Import in newer version of Intellij).
- Locate the build.gradle file (not the root folder as you would do in a normal importing) and select it. Click OK. If asked, choose to Open as Project (not Open as File).
- Click OK to accept the default settings but do ensure that the selected version of Gradle JVM matches the JDK being used for the project.
Design
This section describes the different components of the application and how each component interact with each other to run the program.
Architecture
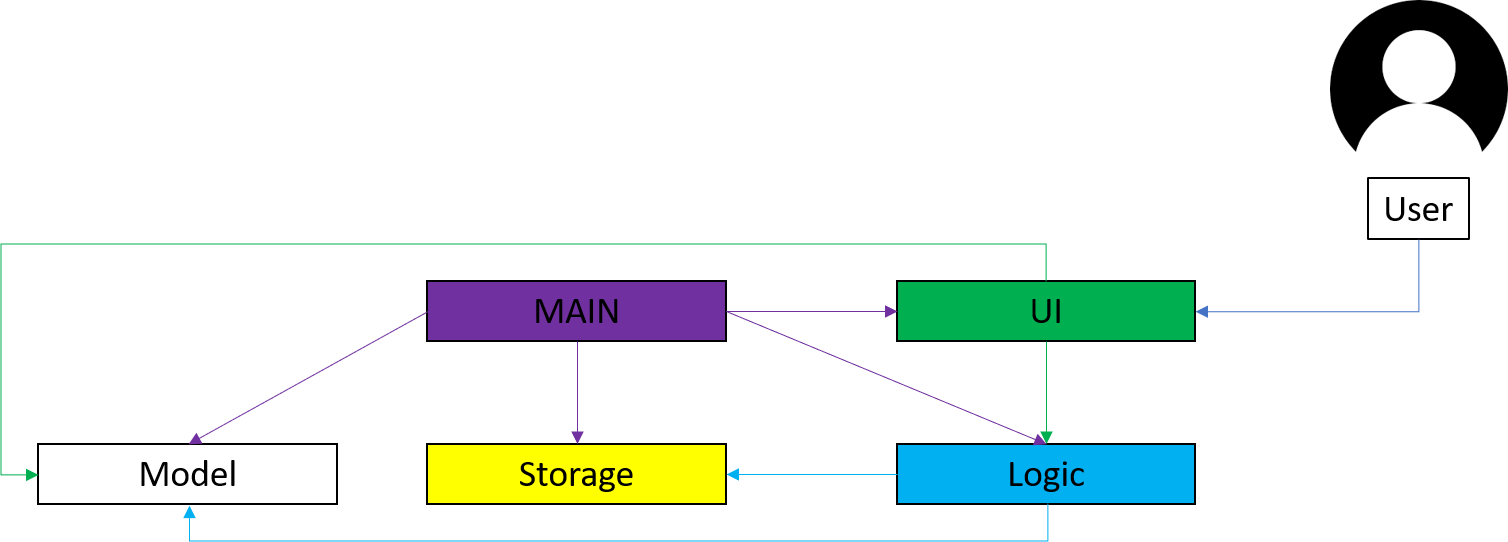
The Architecture Diagram above provides a high-level view of the design of NUSchedule. The app can be broken down into 5 different components:
- Main: Initializes the other components and connects them with each other.
- UI: Manages the User Interface that the user interacts with.
- Logic: Interprets user commands.
- Storage: Reads data from and writes data to the hard disk.
- Model: Stores the data the app uses in memory.
UI
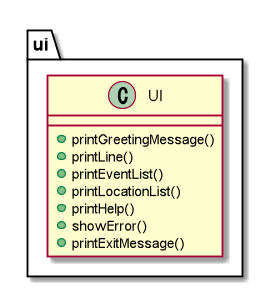
Figure 3.2.1 Class diagram for UI component
API:UI.java
The UI consists of various parts, e.g. printGreetingMessage, printEventList, showError, printNumEvent, etc.
The UI component reads user input using readCommand() and then executes user commands according to the Logic component.
Storage
API:Storage.java
The Storage component can save the list of event data in .txt format and read it back.
Logic
API:Parser.java

Figure 3.4.1 Class diagram for Logic component
The Logic component parses the user input and executes commands based on the given input.
- Parser reads the user input and returns a command to be executed by
NuSchedule. - The command execution affects the EventList (e.g. clearing the list).
- The result passes back to the UI, which then displays relevant feedback to the user (e.g. successful execution).
Model
The Model component stores an ArrayList, events, that represents the current list of events and available locations.
Event
API:EventList.java
Location
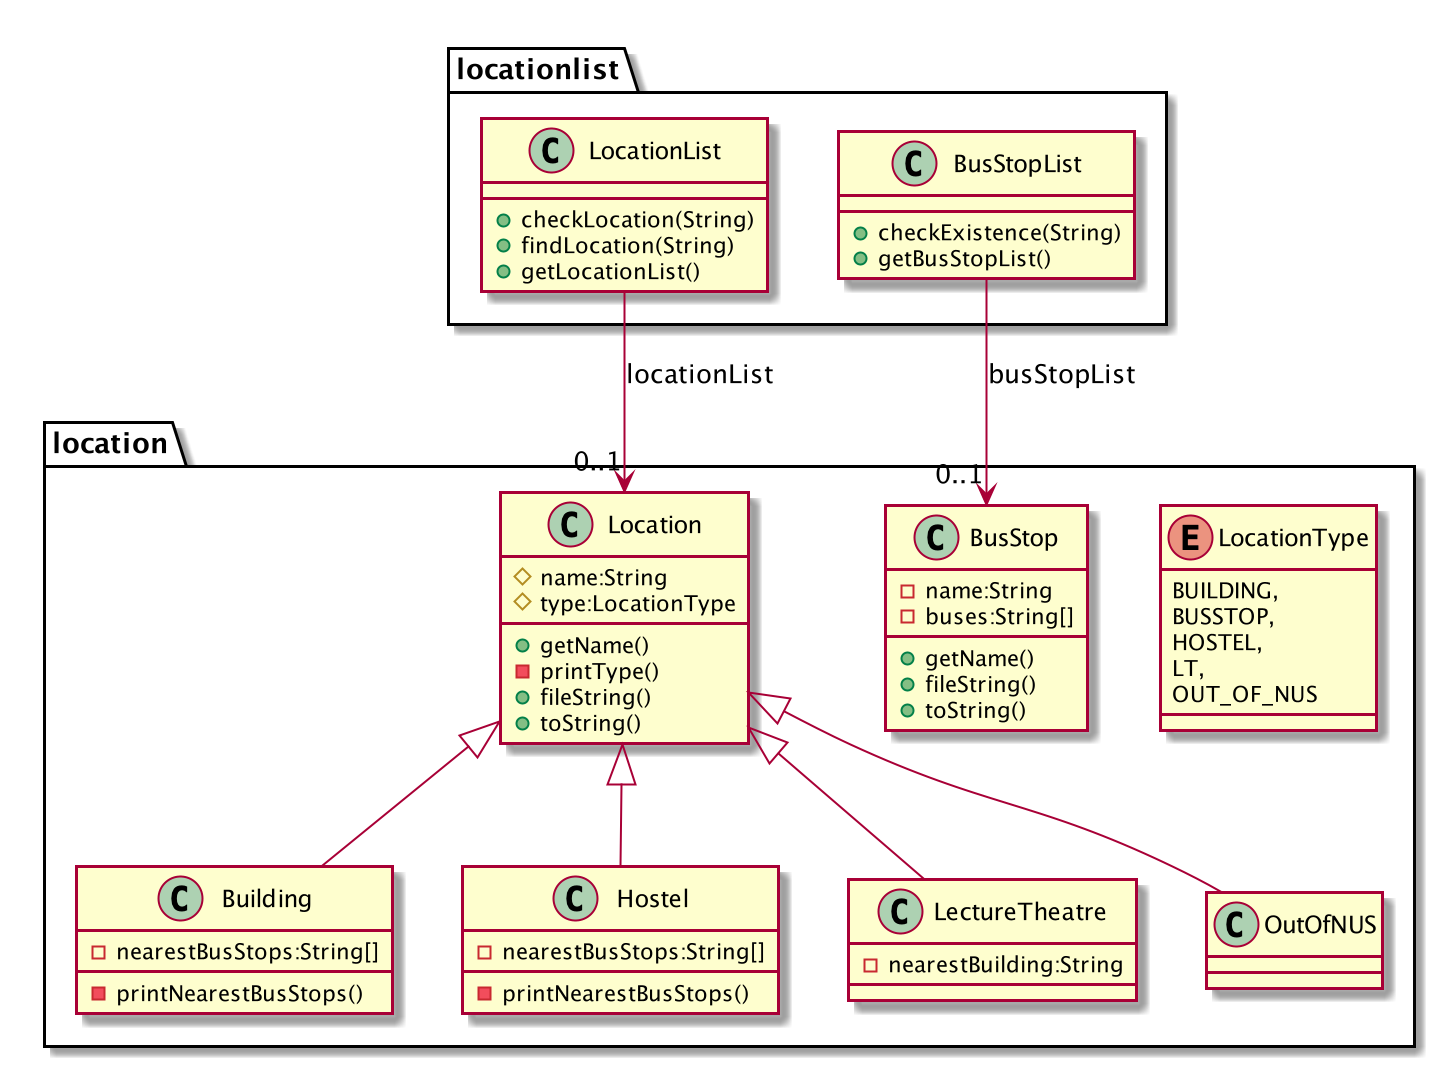
Figure 3.6.1 Class diagram for location component
API: LocationList.java
The LocationList is made up of an ArrayList of Locations, which is a type of variable that stores different information
for different types of location (eg. Building, Hostel, etc.). However, do note that any place that is
not within the list of saved locations will be saved as type OutOfNUS, and would not be saved into the location.txt
file. The location will still be part of the location list before the app closes, and it will also be
saved as part of the Event information.
There is a separate api for bus stops (BusStopList.java), which stores all available bus stops
and their information. Although the variable is declared in the main NUSchedule class, it is only referenced
and not edited in any part of the program.
The Location component
- stores information about various types of locations
- prints the list of locations that is saved in the data file
- checks if a location is being saved in the list and returns the location when asked
Implementation
This section describes the implementation of some noteworthy features.
Add events
This feature allows users to add events and relevant information about them (description, time and location) to the list . There are three possible types of events that can be added: classes, assignments, and personal events.
Given below is an example usage scenario:
Step 1. The user launches the application to add a class to his schedule. The user executes
class CS1010 Lecture /t 2020-05-05 10:00 /e 2020-05-05 12:00 /l LT27 to add a new class to the list.
Step 2. The Parser class parses the input as a new class with description ‘CS1010 Lecture’, starting time ‘2020-05-05 at 10:00’, ending time ’2020-05-05 at 12:00’, and location ‘LT27’.
Step 3. addCommand() is then called with the above parameters, and calls addEvent() from EventList to adds it to the list of events. It also checks
whether there are any events that overlap in timing with the newly added event. The newly added event is then printed for the user through UI.
The sequence diagram below shows the process of adding a new event.
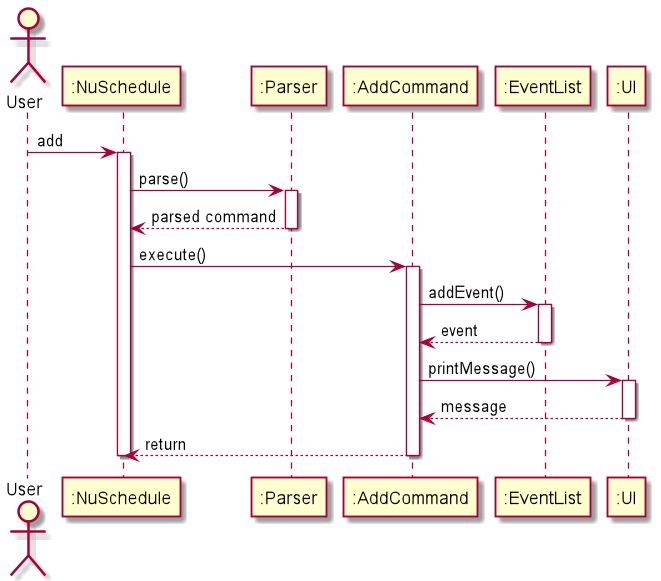
Figure 4.1 Sequence Diagram for add function
Clear events
This feature allows users to completely delete the existing event information that is previously typed in by users. Users may choose to delete all events, events happened one month ago, or events happened before a certain date.
Given below is an example usage scenario:
Step 1. The user launches the application and wants to clear some events that happened a long time ago as there is no
need to refer to these events anymore. The user types clearBefore 2020-06-01 to clear all events before 1st June, 2020.
Step 2. The Parser class parses the input and identifies the full command to be a ClearBeforeCommand class, and so
clearBeforeCommand() will be called to create a clearBeforeCommand object with parameter 2020-06-01.
Step 3. After that, the execute() function of clearBeforeCommand will be called and as a result EventList#clearBefore(clearDate) will
also be called, where 2020-06-01 will be passed as the parameter clearDate.
Step 4. The user wants to clear all the extra information of events but does not want to do it manually, hence the user
types in autoClear on to turn on the autoClear function, which will clear all events happened one month ago automatically.
This function can be switched off by typing autoClear off.
Note that the command clear does not require any parameter input.
The sequence diagram below shows the process of clearing events before a certain date.
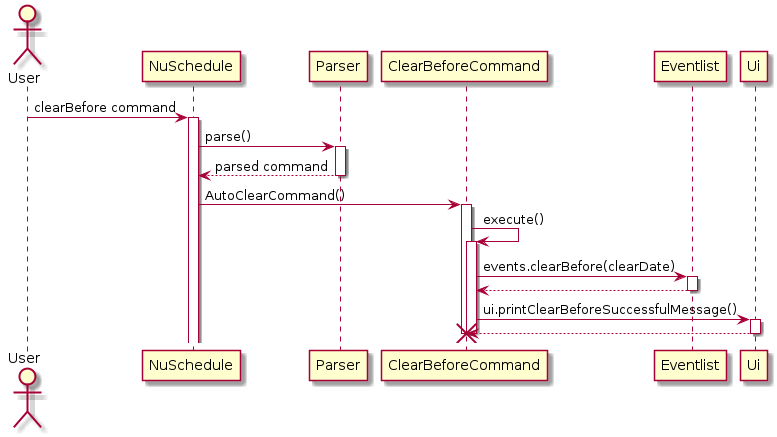
Figure 4.2.1 Sequence Diagram for clearBefore function
The sequence diagram below shows the process of clearing all events.
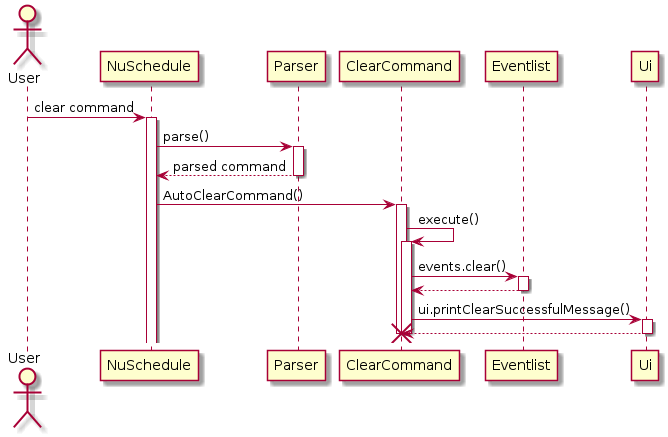
Figure 4.2.2 Sequence Diagram for clear function
Edit events
This feature allows users to edit the information of events that was previously added.
Given below is an example usage scenario:
Step 1. The user launches the application and inputs assignment homework \t 2020-02-02 20:00 \l home command to add an event.
Step 2. The user realises that there was a mistake in the event added and decides to edit the task information by
entering edit 1, which will be parsed by Parser and calls an EditCommand object.
Step 3. The user follows the instructions on screen and enters the desired changes.
Step 4. EditCommand#execute() will call EventList#editEvents to edit the event.

Figure 4.3 Sequence Diagram for EditCommand()
Locate
This feature allows users to add locations as part of the event information. If the place is located within the school, additional information about the location will be provided such as nearest bus stops or buildings. If the place is a bus stop, the buses available will be provided instead. The user will add location name as the last piece of information when adding an event. The LocationList has a method that searches for the place with the exact same name, if such a place is not found, it will create a location and allocate it to be OutOfNUS.
This feature also allows users to search for a location based on a given location name, or the location where an event is held. It will print out additional information about the location to the user.
The locate command executes with the following steps:
Step 1. When the user type in locate [input], the Parser class will extract the input from the command and call a
LocateCommand object.
inputwill always be a String when passed into the command object.
Step 2. LocateCommand will then try to convert the input into an integer, if possible.
Step 3. If conversion is possible, the method will obtain the event at the given index and return its location information.
- Tries to catch
IndexOutOfBoundExceptionto check if the given index is within the range of the event list.
Step 4. If conversion is not possible, then it will check if the given string is a valid location.
- Returns the location if valid
- Prints an error message if invalid
The sequence diagram below shows exactly which methods, from which classes, are called to obtain the required location.
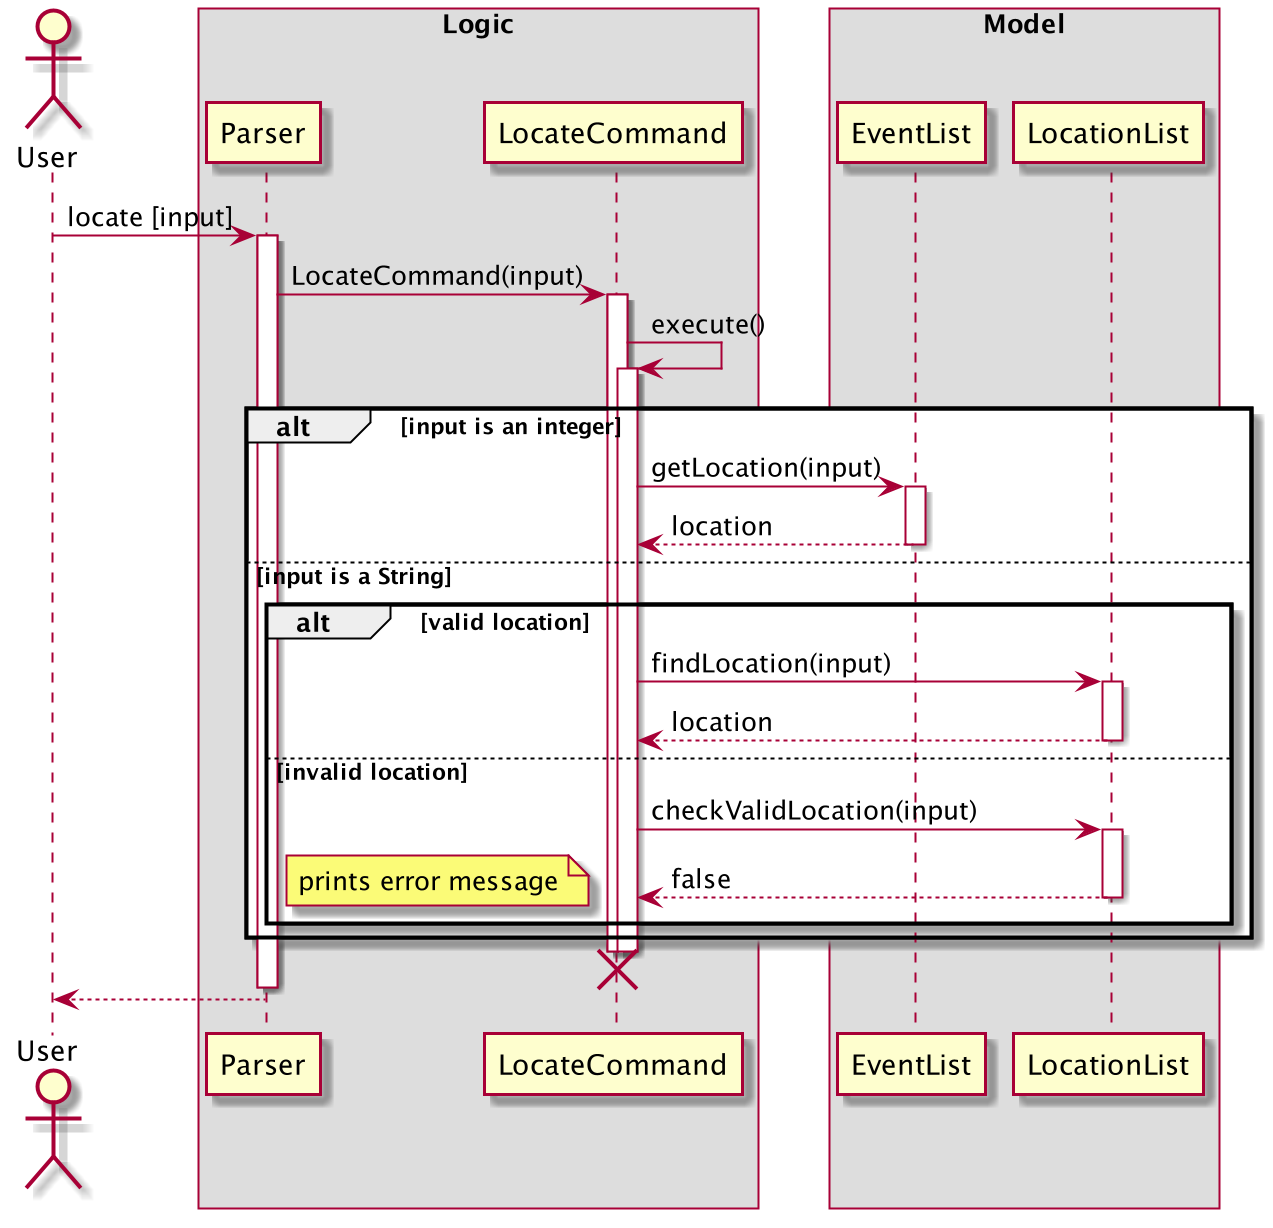
Figure 4.4 Sequence diagram for locate function
Reminder
This feature allows users to get a reminder of the events that will occur today.
Given below is an example usage scenario:
Step 1. The user wants to see all the events that are happening today. He inputs the command reminder.
Step 2. The command filters the list of all events based on the current date.
Step 3. It then calls UI to print the filtered list.
The sequence diagram belows shows the process of executing the reminder command.
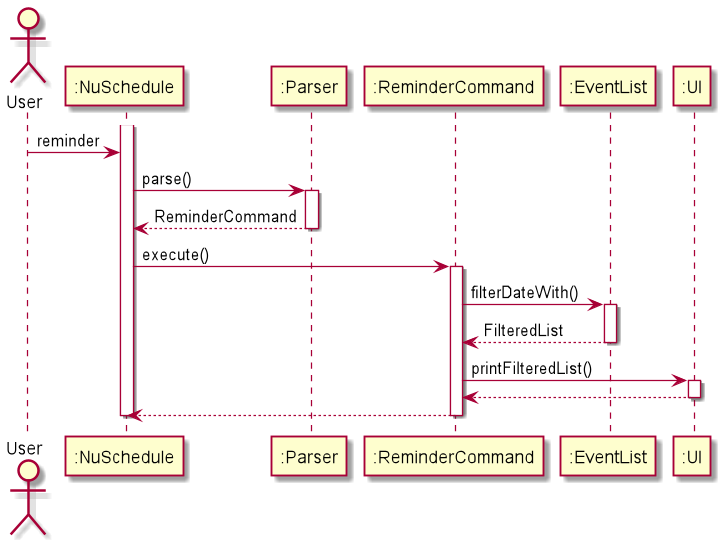 Figure 4.5 Sequence Diagram for reminder function
Sort events
This feature allows users to sort the available task by a sorting criteria. Currently, the sorting criteria available are sorting by time, description and location.
Given below is an example usage scenario:
Step 1. The user wants to view the events in a chronological order.
Step 2. The user enters sort time, which will call the sortCommand() function which will sort all events.

Figure 4.6 Sequence diagram for SortCommand()
View events
This feature allows users to view a numbered list of all the events/tasks they have added so far, in the order which they were added.
Given below is an example usage scenario:
Step 1. The user wants to see a list of all the events he has added so far, and executes the command list.
Step 2. The command calls the printEventList function from UI, which then prints the list of events.
The sequence diagram below shows what happens when the list command is executed.
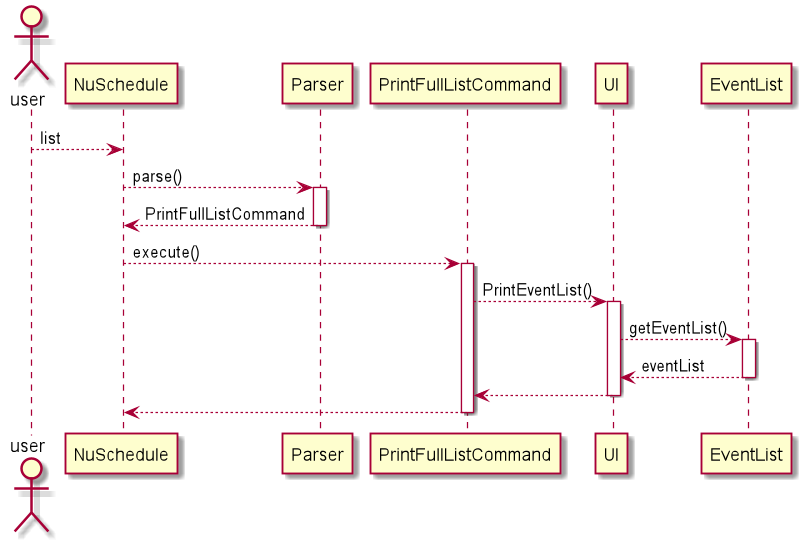 Figure 4.7 Sequence Diagram for list function
Help
This feature allows users to view a summary of all the features available for the current version of NUSchedule.
When the user inputs help, all available commands and a simple description for each of them will be printed.
The sequence diagram below shows what happens when user enters help:
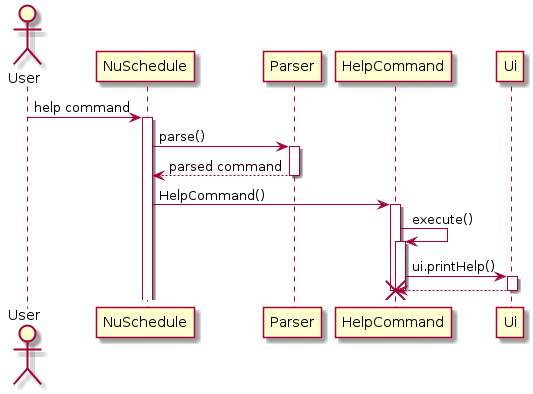
Figure 4.8 Sequence Diagram for help function
Repeat
This feature allows users to repeat all classes in the current week or a selected event for several weeks.
Delete
This feature allows the user to delete unwanted events. DeleteCommand#Execute deletes the specified event in the
following steps:
Step 1. The user enters delete NUMBER where NUMBER refers to the index of the command to be deleted. The user input is parsed by the Parser class which creates a new DeleteCommand object.
Step 2. Eventlist#remove() is called which will delete the event with the specified index.
Find
This feature allows the user to filter his/her events by a particular keyword. This command will search through all the events and find events that have descriptions containing the search criteria. The process takes place in the following steps:
Step 1. The user enters find CRITERIA which will be parsed by the Parser class. The Parser class will create a new FindCommand
object.
Step 2. EventList#filterWith() will be called which will create a ArrayList containing events that match the specified criteria.
Step 3. UI#printFilteredEventList is called to print out the events.
Find based on date
This feature allows users to find events on the date inputted by the user.
Given below is an example usage scenario:
Step 1. The user wishes to find events happening on a certain date, so he inputs date 2020-10-10.
Step 2. This executes FindDateCommand, which calls filterDateWith(2020-10-10) to create a new filtered list.
Step 3. This filtered list is then printed by calling printFilteredDateEventList from UI.
Print locations of a certain group
This feature allows users to know locations in a certain faculty, including blocks and lecture theatres when users input abbreviations of various faculties (e.g. FOS).
The sequence diagram belows shows what happens when user input any faculty abbreviation:
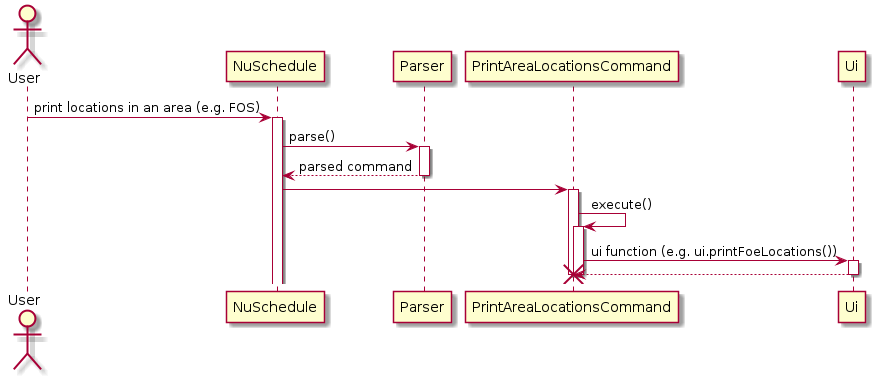
Figure 4.13 Sequence Diagram for print area locations function
Study time
This feature allows the user to know the amount of time spent on study for certain date. The command is studyTime DATE.
Done
This feature allows users to mark an event as done, provided the event's time has passed. With the exception of event
type Assignment, all the other event types cannot be marked as done before event occurs.
DoneCommand marks an event as done with the following steps:
Step 1. The user will input done followed by an integer that represents the index of the event they want to mark as
done.
Step 2. The program will first check if the index is valid. If invalid, application will print an error message.
Step 3. Then it will check for the type and time of event. If the time of event is later, and the event is not an
Assignment, then it will print a warning message. Else, it will mark the event as done.
User Info
This feature allows users to input information about themselves into the app, specifically their name, and whether they are a student or a professor.
Given below is an example usage scenario:
Step 1: The user wishes to store his personal information, so he inputs student Harry.
Step 2: This calls the UserInfoCommand, which stores his name, Harry, and type, student in UserInfo.
-
The user enters
delete NUMBERwhereNUMBERrefers to the index of the command to be deleted. The user input is parsed by the Parser class which creates a newDeleteCommandobject. -
Eventlist#remove()is called which will delete the event with the specified index.
Exit
This feature allows users to terminate this app. By inputting bye, the isExit flag of the app will be changed to true, and the app will exit with
an exit message.
Documentation
All documentation can be found in the docs/ folder.
- Jekyll is used to manage documentation.
- Markdown style is used for the documentation.
- PlantUML is used to create the diagrams.
Testing
JUnit is used to write tests for the project. Learn more about JUnit here.
If you are using IntelliJ, you can run all test by right-clicking on the test/java folder and selecting Run 'Tests' or press CRTL + SHIFT + F10
on your keyboard. Alternatively, you can open a console and run the command gradelw clean test (Mac/linus: .gradlew clean test).
Appendix A: Product scope
User profile
Target user profile:
- NUS student or staff
- able to type quickly
- has quite a number of events to keep track of
- prefers to use desktop apps
- prefers using Command Line Interface (CLI) apps
- prefers typing instead of mouse interactions
Value proposition
NUSchedule aims to assist the target audience with:
- managing all their events in one application (personal or work)
- easily finding out about the location of their events
Appendix B: User stories
| Version | As a ... | I want to ... | So that I can ... |
|---|---|---|---|
| 1.0 | busy individual | keep track of both personal and school activities | avoid clashing events |
| 1.0 | freshman | know module details and lesson venues | be on time for my activities |
| 1.0 | forgetful person | be reminded of the deadlines for my assignments | submit on time |
| 1.0 | tutor | know the estimated time for my students to travel to their next class | pace my lesson suitably |
| 1.0 | hardworking student | track how much time I have spent studying | allocate my time efficiently |
| 2.0 | exchange student | know the optimal path to reach my next destination | avoid getting lost |
| 2.0 | user | find a to-do item by name | locate a to-do without having to go through the entire list |
| 2.0 | professor | Know whether my students have another lesson after mine and the expected time of travelling | Pace my lesson appropriately |
| 2.0 | student using zoom for lessons | record the virtual locations | store the links and passwords of the meetings |
| 2.1 | student having periodic lessons | repeat the classes on a weekly basis | spend less time in adding same classes but just different weeks |
Appendix C: Non-Functional Requirements
-
This application will work on any computers running either Windows, macOS or Unix that has Java 11 or a higher version installed.
-
A user that is proficient in typing will find this application to be faster and more convenient to use than applications that requires mouse clicks.
Appendix D: Instructions for manual testing
-
Initial launch
- Download the jar file here and place it in an empty folder.
- Open the command prompt and enter the command
java -jar NuSchedule.jar. - Expected: The application shows the NuSchedule logo.
-
Adding events
- Test case:
assignment homework /t 2020-02-02 20:00 /l home - Expected: Confirmation message to indicate that the assignment has been added successfully.
- Test case:
class cs2113 /t 2020-02-02 20:00 /e 2020-02-02 21:00 /o zoom.com /p 123 - Expected: Confirmation message to indicate that the class has been added successfully.
- Test case:
personalEvent shopping /t 2020-02-02 21:00 /e 2020-02-02 22:00 /l supermarket - Expected: Confirmation message to indicate that the personal event has been added successfully.
- Test case:
-
Editing events
- Test case:
edit NUMBERwhereNUMBERis the index of the event to be editted. - Expected: Confirmation message asking for the desired changes.
- Test case: